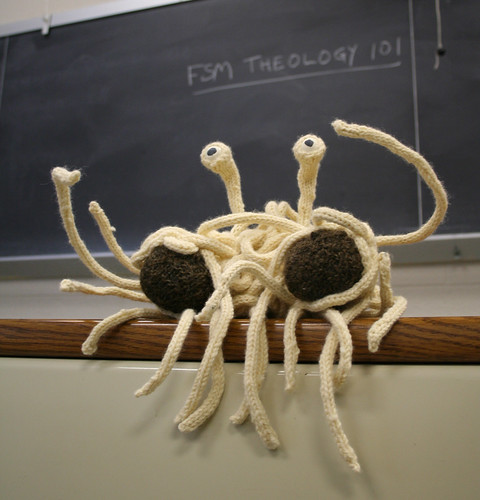
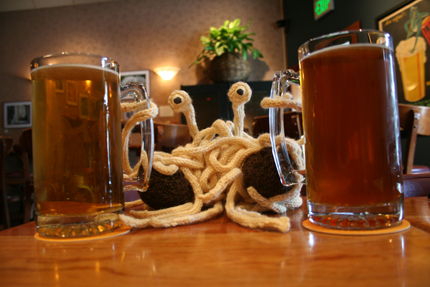
Directions for the Flying Spaghetti Monster
First of all, I would like to give credit to Sherry's FSM and Lucia's FSM; both excellent patterns and worth checking out.
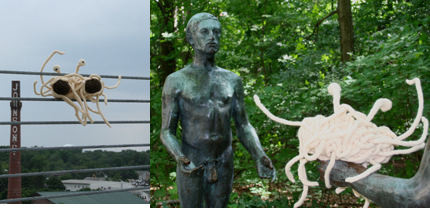
However, I wanted an FSM with some mass to the body as well as posable noodly appendages. I wanted to go for the "classic" FSM look, as depicted in Niklas Jansson's rendition:

(Image courtesy of Wikimedia Commons)
To make your own FSM, you will need the following:
Approximately 300 yards of worsted weight pasta-colored yarn
Approximately 50 or so yard of Aran weight meatball-colored yarn (a heathery/lightly variegated wool works well)
At least 18 inches of heavier gauge wire, such as 18 gauge
Lighter-gauge wire, such as 24 gauge (thicker florists' wire works well)
Wire-cutters
Size 7 dpns
Stuffing material
1/2 oz of white Sculpey or Fima clay
Less than 1/4 oz of black Sculpey or Fima clay
Tapestry needle
Optional, but recommended:
Electrical tape
Glue
Directions:
The Meatballs and FSM Body portion of the pattern are heavily adapted from "ohballs" by Marcie Nishioka.
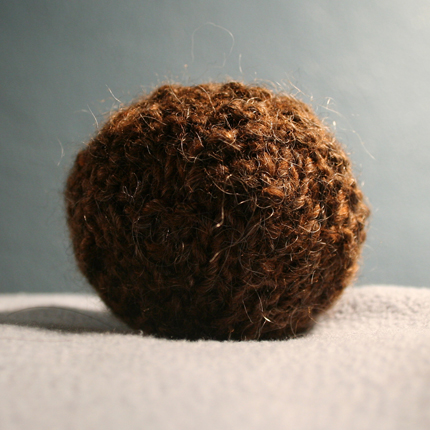
Meatballs
Needed:
Aran weight meatball-colored yarn
Size 7 dpns
Tapestry needle
Cast on 6 sts and divide among 3 dpns. Place stitch marker and begin to knit in the round. Pay careful attention to * (not all round begin with the *). Don't worry about making mistakes with knitting or purling. The point of the purls is to add random texture to the ball, so their placement is not crucial. Do, however, be sure to be accurate with your number of increases or decreases per round.
Rd1: kfb all sts (12)
Rd2: knit around to marker
Rd3: *p1, kfb, repeat from * to marker (18)
Rd4: *p1, k2, repeat from * to marker
Rd5: *k1, p1, kfb, repeat from * to marker (24)
Rd6: k1, *p2, k2, repeat from * to marker, end with a k1
Rd7: *p1 k1, p1, kfb, repeat from * to marker (30)
Rd8: p1,*k2, p3, repeat from * to marker, end with a p2
Rd9: *k1, p1, k2, kfb, repeat from * to marker (36)
Rd10: k1, *p2, k2, repeat from * to marker, end with a k1
Rd11: *k1, p2, k2, p2, k2, p2, kfb, repeat from * to marker (39)
Rd12: *p1, k2, p2, k2, p2, k2, p2, repeat from * to marker
Rd13: same as Rd12
Rd14: *k1, p2, k2, p2, k2, p2, k2, repeat from * to marker
Rd15: *k1, p2, k2, p2, k2, p2, k2tog, repeat from * to marker (36)
Rd16: p1, *k2, p2, repeat from * to marker, end with a p1
Rd17: *p1, k2, p1, p2tog, k1, p2, k1, k2tog, repeat from * to marker (30)
Rd18: *k1, p2, k2, p1, k2, p2, repeat from * to marker
Rd19: *k1, p2, k2tog, p1, k2, p2tog, repeat from * to marker (24)
Rd20: *p1, k2, p1, k1, p2, k1, repeat from * to marker
Rd21: *p1, k1, k2tog, k1, p1, p2tog, repeat from * to marker (18)
Rd22: k1, *p3, k3, repeat from * to marker, end with a k2
Stuff balls. I recommend using a bundle of the same yarn that you are using to make the meatballs with. It does feel like you are wasting a lot of yarn, but you do not have to worry about a contrasting color peeking out between the stitches.
Rd23: *k1, k2tog; repeat from * to marker (12)
Rd24: knit around to marker
Rd25: *k2tog; repeat from * to marker (6)
Cut yarn leaving a 12-inch tail. Thread needle with yarn tail, pull through remaining
stitches and knot discreetly. Run needle down the center of ball and through to other side. Trim excess yarn close to meatball body.
Repeat for the second meatball.
FSM Body
Needed:
Worsted weight pasta-colored yarn
Size 7 dpns
Stuffing material
Tapestry needle
Cast on 6 sts and divide among 3 dpns. Place stitch marker and begin to knit in the round.
Round 1: kfb all sts (12 sts)
Round 2: knit
Round 3: *k1, kfb; repeat from * (18 sts)
Round 4: knit
Round 5: *k2, kfb; repeat from * (24 sts)
Round 6: knit
Round 7: *k3, kfb; repeat from * (30 sts)
Round 8: knit
Round 9: *k4, kfb; repeat from * (36 sts)
Rounds 10-35: knit
Round 36: *k4, k2tog; repeat from * (30 sts)
Round 37: knit
Round 38: *k3, k2tog; repeat from * (24 sts)
Round 39: knit
Round 40: *k2, k2tog; repeat from * (18 sts)
Round 41: knit
Stuff tube with batting.
Round 42: *k1, k2tog; repeat from * (12 sts)
Round 43: knit
Round 44: *k2tog; repeat from * (6 sts)
Cut yarn leaving a 9-inch tail. Thread needle with yarn tail, pull through remaining
stitches and knot discreetly. Run needle down the center of ball and through to other
side. Snip excess tail close to ball’s surface.
With these three parts and a naughty imagination you could make something else entirely at this point.
Go ahead. I won't judge you.
Eyeballs
Needed:
Heavier gauge wire, such as 18 gauge
Lighter-gauge wire, such as 24 gauge (thicker florists' wire works well)
Wire-cutters
1/2 oz of white Sculpey or Fima clay
Less than 1/4 oz of black Sculpey or Fima clay
Take white Sculpey or Fima clay and roll into two balls, each approximately 3/4 inches in diameter (1/4 oz of clay each). Add a small (1/4 inch) black circle of clay to the middle.
While leaving the front half of each sphere intact, carefully mold the back end into a blunt point
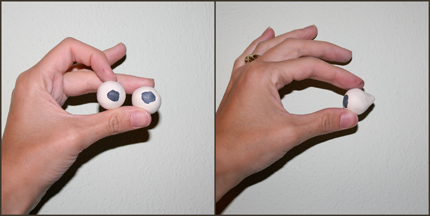
Measure and cut at least 26 inches of thin, flexible craft wire (longer is always better, though). Straighten one end and carefully slide 6 inches of wire through the back of one of the eyeballs. Be sure not to slice or cut the clay with the wire. Repeat for the other eyeball.
Bake eyeballs and wire according to directions.
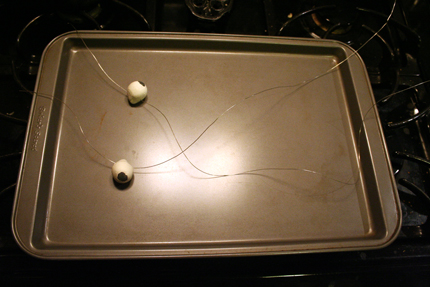
Let cool completely.
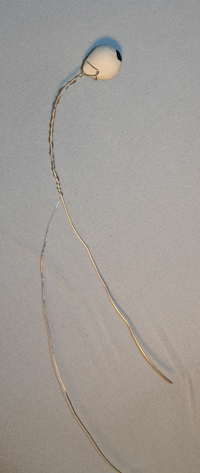
I recommend folding down the very end of the long side of the wire and wrapping it a couple of times with electrical tape, just to prevent having a "pokey" end.
Measure and cut 9 inches of thicker wire (strong enough so that it will hold up the eyeball without bending, such as 18 gauge). Bend one end of the wire into an "eyestalk" shape - a gradual 90 degree angle.
Take thin wire that is on either side of the eyeball and wrap it around the back of the eyeball cone, in order to prevent the eyeball from swinging down. Place the thick wire at the back of the eyeball and begin wrapping both of the thin wires around the thick wire. Stop wrapping when you reach the end the of the short thin wire (5-6 inches).
Before you ask - yes, you could insert the large wire into the clay and bake it too. However, it will most likely slide right out anyway while you are working on the eyestalk sheath. So there.
Eyestalk Sheath
Needed:
2 Eyeballs (see previous section)
Worsted weight pasta-colored yarn
Size 7 dpns
Tapestry needle
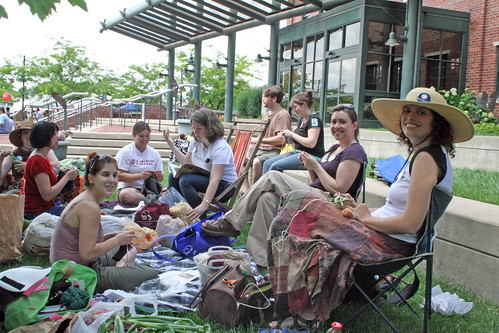
Be sure to plan on knitting this portion of the FSM somewhere in public (a coffee shop, library, etc.) in order to ensure the most number "What in the world are you making?" questions, as well as dumbfounded stares. If you are lucky you will encounter distraught parents who will desperately pull their children away from the "weird person sitting in the corner knitting eyeballs." No matter what, you are guaranteed to provide people with conversation fodder for the day.
Cast on 12 stitches, leaving a long tail hanging from your original slip knot. Evenly disperse your stitches on 3 needles.
Row 1: Knit around with both working yarn and tail yarn, to ensure an even first row with no gaps.
Row 2: Drop the tail yarn and knit with just the working yarn, being sure to pick up 2 yarns with each stitch (the previous working yarn and tail yarn), so that you don't add any extra stitches.
Row 3-4: k12
Row 5: k10, ssk
Rows 6-7: k11
Insert eyeball into knitted tube, with pupil centered in hole surrounded by your first row of stitches (we will continue to knit down and around the wire).
If the eyeball is too large or too small for the opening, then redo the tube, adding or decreasing the original number of cast on stitches as deemed necessary.
Row 8: k6, ssk, k3
Row 9: k10
Row 10: k2, ssk, k6
Rows 9-10: k9
Row 11: k7, ssk
Rows 12-13: k8
Row 14: k4, ssk, k2
Rows 15-16: k7
Row 17: k1, ssk, k4
Rows 18-19: k6
Row 20: k4, ssk
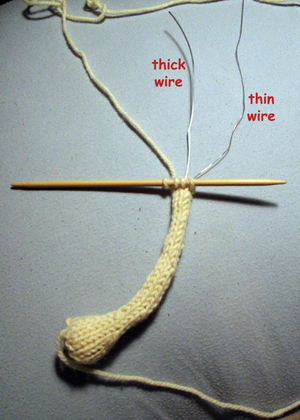
Row 21: knit all 5 stitches onto a single needle, being sure to keep them in the correct order and not twisted.
Rows 20-22: knit as in i-cord, being sure to keep the wires inside the cord as you knit.
Row 23: k3, ssk
Continue to knit as a 4-stitch i-cord until the eyestalk is the desired height (approx. 5-6 inches). At this point you will separate the thicker, 18 gauge wire from the thinner, flexible wire. You will continue to wrap the thinner wire in i-cord, whereas the thicker wire will be left bare (to be later inserted into the FSM body). To do this, lay the eyestalk in front of you, after having just finished a row. Your needle will be in the front, with the yarn off to the left. Separate the two wires slightly so that the thinner wire is to the right and the thicker wire is between the yarn and the thinner wire.
Carefully lift the yarn over the thicker wire so that the yarn is now between the two wires. Then carry the yarn under the thinner wire so that the yarn is farthest to the right.
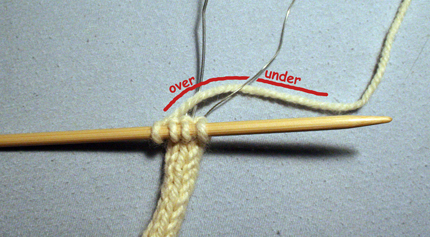
Now start a new row of i-cord.
Repeat this procedure for several rows until the thicker wire is clearly separate from the i-cord.
Continue to knit i-cord to the end of the thin wire. Bind off.
At this point I recommend positioning the eyeball in the tube exactly as desired and applying a small amount of clear glue around the perimeter to keep it secure.
At this point in time your eyestalk may just resemble the trash compactor monster from Star Wars.

But we will save that project for another time.
Repeat for the second eyeball.
Posable Noodly Appendages
Needed:
Lighter-gauge wire, such as 24 gauge
Wire-cutters
Worsted weight pasta-colored yarn
Size 7 dpns
Tapestry needle
Take the wire and cut one piece approximately 50 inches long, and 2 lengths of wire approximately 30 inches long.
I recommend folding down the ends of the wire and wrapping it a couple of times with electrical tape, just to prevent having a "pokey" end.
Cast on 4 stitches.
Knit 3 rows of icord.
Insert one end of one of the wires into the middle of the icord.
While holding onto the wire, continue knitting icord so that the wire stays in the middle of the cord.
Knit icord until you have reached the end of the wire.
Bind off.
Sew yarn ends back up into the appendage.
You may make more posable noodly appendages if you wish, however I recommend three as the minimum.
Limp Noodly Appendages
Needed:
Worsted weight pasta-colored yarn
Size 7 dpns
Tapestry needle
Cast on 4 stitches.
Knit icord until you have reached the desired length.
Bind off.
Sew yarn ends back up into the appendage.
I recommend making a variety of different lengths, between 20-40 inches each.
Go through almost all of your remaining yarn to make several appendages. However, leave enough yarn for assembly (about 30-40 yards or so).
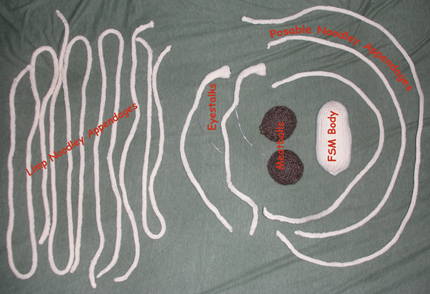
This is what you should have so far:
Assembly:
Worsted weight pasta-colored yarn
Tapestry needle
Slide Eyestalk into FSM body until thick wire pushes all the way through the bottom. Carefully bend the thick wire forward at the point where it comes out of the bottom of the body. Wrap the wire around to the front of the body, so that it lies flush against it. With a few small stitches, sew the wire to the front of the body.
Repeat for the second Eyestalk.

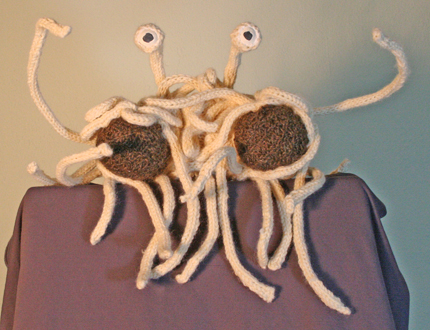
Sew Meatballs to the front of the body, at either ends.
Using your shortest Limp Noodly Appendage, leave 6-7 inches hanging and wrap appendage around where Meatball joins with FSM Body. Sew in place.
Repeat for the second Meatball.
Take remaining end of Eyestalk (the Posable Noodly Appendage end) and sew part of it down to the FSM body, leaving a few inches hanging.
Sew longest Posable Noodly Appendage next. Leave 8-10 inches of either end protruding from either side, to use as "arms" so that your FSM can hold things.
Sew all remaining Appendages on to the body.
Suggestions:
Make sure the noodles bend and turn often.
Be careful of the Eyestalks while sewing the other noodles on; they can be somewhat fragile.
When attaching the Posable Appendages, have part of the loops stick out from the FSM body (i.e., don't sew everything tightly against the body).
Having all the Limp Appendages ends hang consistently about 6-8 inches from the bottom of the body tends to look good aesthetically.
Wrap many noodles around the Meatballs as well, so that they appear to be more a part of the body mass, not just stuck on the outside.
Don't forget the back and the underside.

You may find the pattern on Ravelry here.